포스팅 시리즈
- 2020/09/28 - [Dev/Spring] - [Spring] Spring Boot 시작하기 (1) - 프로젝트 생성
- 2020/09/29 - [Dev/Spring] - [Spring] Spring Boot 시작하기 (2) - Thymeleaf 뷰 템플릿 사용
- 2020/09/30 - [Dev/Spring] - [Spring] Spring Boot 시작하기 (3) - Lombok 사용 기본
- 2020/10/05 - [Dev/Spring] - [Spring] Spring Boot 시작하기 (4) - Mybatis, MySQL 연동
- 2020/10/06 - [Dev/Spring] - [Spring] Spring Boot 시작하기 (5) - log4jdbc를 이용한 Query로깅
- 2020/10/07 - [Dev/Spring] - [Spring] Spring Boot 시작하기 (6) - 에러 페이지 처리
- 2020/10/08 - [Dev/Spring] - [Spring] Spring Boot 시작하기 (7) - MyBatis에서의 DataBase 다중 연결

이전 포스팅에서 lombok 설치, 프로젝트 생성을 진행했고, 컨트롤러를 작성해 간단한 응답, 요청까지 확인했습니다.
이번 시간에는 Spring Boot에서 사용되는 View Template인 Thymeleaf 사용법에 대해 포스팅하겠습니다.
우선 타임 리프의 특징은 아래와 같습니다.
- *.html 확장자를 사용한다.
- 별도의 레이아웃 프레임워크의 도움 없이 레이아웃을 관리할 수 있다.
- 스크립트릿이 아닌 HTML 문법으로 JAVA 데이터를 처리할 수 있다.
생산성 하나에 엄청나게 공을 들인 느낌이 납니다.
타임 리프에서는 JSP의 스크립트릿은 사용할 수 없고, 대신 같은 기능을 하는 ${}과 같은 표현식을 사용할 수 있습니다.
하지만 스크립트릿과는 다르게 HTML 코드의 심미성을 크게 해치지 않습니다.
각설하고, 그럼 이 thymeleaf를 Spring Boot 프로젝트에서 어떻게 사용하는지 알아보겠습니다.
1. Thymeleaf prefix, suffix 정의
먼저, Thymeleaf 파일을 어디서 관리할 것인지 application.properties에 정의해야 합니다.
아래의 내용을 추가합니다.
# 정적 리소스에 변화가 있을 때 바로 반영한다.
spring.devtools.livereload.enabled=true


# thymeleaf 참조 경로
spring.thymeleaf.prefix=classpath:/templates/
spring.thymeleaf.suffix=.html

# thymeleaf에 대한 캐시를 남기지 않는다. cache=false 설정(운영시는 true)
spring.thymeleaf.cache=false
# templates 디렉토리에 파일이 있는지 없는지 체크, 없으면 에러를 발생시킨다.
spring.thymeleaf.check-template-location=true
설정을 보면 클래스 패스 templates/라고 정의했는데, 이제부터는 이 templates에서 타임리프를 관리할 것입니다.
그리고 suffix로는 html 확장자 지정해, 컨트롤러에서 타임리프 뷰를 호출할 때 확장자를 붙이지 않아도 인식하도록 합니다.
그 외에는 개발 시에 필요한 자잘한 설정입니다.
2. 레이아웃 정의

src/main/reslources의 templates 패키지 안에 뷰 파일을 생성합니다.
참고로 아래 스태틱 폴더에는 js, css등과 같이 변하지 않는 파일들을 관리합니다.
먼저 다른 view들이 공유할 레이아웃을 정의하겠습니다.

templates 패키지 안에 layout이라는 패키지를 만들고, 그 안에 default_layour.html이라는 파일을 생성합니다.
그리고 default_layout.html의 내용을 지우고 아래의 내용을 입력합니다.
<html lang="ko"
	xmlns:th="http://www.thymeleaf.org"
    xmlns:layout="http://www.ultraq.net.nz/thymeleaf/layout">

    <!--/* 이곳에 각 view가 위치합니다. */-->
    <th:block layout:fragment="head"></th:block>

    <div>
        <div layout:fragment="header"></div>

        <div layout:fragment="content"></div>

        <div layout:fragment="footer"></div>
    </div>
</html>
레이아웃은 head, header, content, footer로 이루어지도록 구현합니다.
head에는 title 태그, css 등을 포함할 예정입니다.
여기서 html 태그에 xmlns 속성에 주목해주세요.
xmlns의 정의가 없으면 타임리프 문법을 사용할 수 없으니 반드시 넣어줍니다.
이것으로 레이아웃 정의는 완료되었습니다.
기존의 Spring에서의 tiles 프레임워크 같은 복잡한 절차가 필요하지 않습니다.
이제 공통으로 사용될 header와 footer 파일을 정의하겠습니다.
3. 공통 레이아웃 요소 정의
2번에서 레이아웃을 정의할 때 header와 footer를 삽입하는 구문이 있었습니다.
본 예제에서는 header와 footer 파일을 templates의 fragmants 패키지에서 관리하겠습니다.

templates 패키지에 fragments 패키지를 생성하고 header.html, footer.html 파일 생성 후 아래의 코드를 작성합니다.
# header.html

<html xmlns="http://www.w3.org/1999/xhtml" xmlns:th="http://www.thymeleaf.org">
    <div class="header">
        <h2>Header</h2>
    </div>
</html>
# footer.html

<html xmlns="http://www.w3.org/1999/xhtml" xmlns:th="http://www.thymeleaf.org">
    <div class="footer">
        <h2>Footer</h2>
    </div>
</html>
4. content 작성

templates에 content라는 패키지를 만들고 그 안에 home.html 파일을 생성합니다.
그리고 아래의 내용을 작성합니다.
# home.html

<!DOCTYPE html>
<html xmlns="http://www.w3.org/1999/xhtml"
      xmlns:th="http://www.thymeleaf.org"
      xmlns:layout="http://www.ultraq.net.nz/thymeleaf/layout"
      layout:decorate="~{layout/default_layout}">

    <th:block layout:fragment="head">
    	<title>Spring Boot</title>

        <!--/* css */-->
        <link th:href="@{/css/common.css}" rel="stylesheet" />
    </th:block>
    <body>
        <th:block layout:fragment="header" th:include="@{/fragments/header}"></th:block>

        <div layout:fragment="content" class="content">
            <h2>This is Content</h2>
        </div>

        <th:block layout:fragment="footer" th:include="@{/fragments/footer}"></th:block>
    </body>
</html>
위 코드에서 가장 중요한 부분은 html 태그의 layout:decorate 요소입니다.
레이아웃 소스코드를 어떤 것으로 지정할 것인지를 정의하는 요소로, 본 예제에서 사용하는 레이아웃 파일은 layout 폴더의 defaout_layout 파일이므로 layout/default_layout이라 정의합니다.
레이아웃에서 정의한 head, header, content, footer에 대한 정의를 <th:block layout:fragment="요소 명"></th:block> 형태로 작성합니다.
header와 footer는 fragments에서 정의한 파일들을 inlcude 하고 있습니다.
이제 컨트롤러에서 home.html를 요청하면 default_layout.html에서 정의한 형태로 view가 렌더링되어 브라우저에 출력됩니다.
그전에, 예제에서 정의한 각 레이아웃 요소들을 구별하기 쉽게 간단한 css 파일을 추가하도록 하겠습니다.

static 폴더에 css 폴더를 생성하고 common.css라는 이름의 파일을 생성하고 아래의 코드를 작성합니다.
body, html {
    height: 100%;
}

.header {
    background-color: Gray;
    height: 20%
}

.content {
    height:60%;
}

.footer {
    background-color: yellow;
    height: 20%
}
5. Controller 수정
이전 포스팅에서 작성한 HomeController의 내용을 아래와 같이 수정합니다.
// HomeController.java

@Controller
public class HomeController {
	@RequestMapping(value = "/home", method=RequestMethod.GET)
	public String goHome(HttpServletRequest request) {
		return "content/home";
	}
}
페이지를 표시할 것이므로 이전 포스팅에서 작성되어있던 @ResponseBody 어노테이션을 제거해주고 goHome 메서드에서 return 값으로 "content/home"을 지정했습니다.
이는 application.properties에서 프리픽스로 지정한 클래스 패스 templates안의 content 안에 home.html을 반환하겠다는 의미입니다.
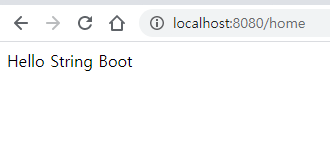
이제 localhost:8080/home으로 접속하면 아래와 같은 화면을 출력하게 됩니다.

6. Controller에서 값을 받아 Thymeleaf에 파싱 하기
본 포스팅에서는 thymeleaf의 모든 표현식을 다 다루지는 못하고, 컨트롤러에서 보내오는 list 데이터를 반복문을 사용해서 페이지에 파싱 해주는 작업까지 해 보겠습니다.
먼저, 컨트롤러를 수정해서 간단한 데이터를 준비하겠습니다.
//HomeController.java

@Controller
public class HomeController {
	@RequestMapping(value = "/home", method=RequestMethod.GET)
	public ModelAndView goHome(HttpServletRequest request) {
		ModelAndView mav = new ModelAndView();
		List<String> resultList = new ArrayList<String>();

		resultList.add("AAA");
		resultList.add("BBB");
		resultList.add("CCC");
		resultList.add("DDD");
		resultList.add("EEE");
		resultList.add("FFF");

		mav.addObject("resultList",resultList);
		mav.setViewName("content/home");

		return mav;
	}
}
데이터와 뷰 정보를 같이 반환해주어야 하므로 기존의 goHome 메서드의 반환형을 String에서 ModelAndView로 바꿔줍니다.
그리고 List <String> 타입으로 데이터를 복수개 추가해주고 ModelAndView 객체에 담아 반환합니다.
이제 home.html 파일을 열고 아래와 같이 수정해줍니다.
# home.html

<!DOCTYPE html>
<html xmlns="http://www.w3.org/1999/xhtml"
      xmlns:th="http://www.thymeleaf.org"
      xmlns:layout="http://www.ultraq.net.nz/thymeleaf/layout"
      layout:decorate="~{layout/default_layout}">

    <th:block layout:fragment="head">
    	<title>Spring Boot</title>

        <!--/* 이 영역에 공통으로 사용할 css, js library를 선언한다. */-->
        <link th:href="@{/css/common.css}" rel="stylesheet" />
    </th:block>
    <body>
        <th:block layout:fragment="header" th:include="@{/fragments/header}"></th:block>

        <div layout:fragment="content" class="content">
            <h2>This is Content</h2>
            <hr>
            <!-- 아래의 코드를 추가 합니다.-->
            <table border="1">
                <tr>
                    <th>TEXT</th>
                </tr>
                <th:block th:each="rl : ${resultList}">
                    <tr>
                        <td th:text="${ rl }"></td>
                    </tr>
                </th:block>
            </table>

        </div>
        <th:block layout:fragment="footer" th:include="@{/fragments/footer}"></th:block>
    </body>
</html>
타임리프에서는 th:each를 이용해 반복 가능한 변수를 순회하는 것이 가능합니다. JSTL에서의 c:foreach와 동일한 역할을 하지만, 타임리프에서는 반복문을 html 태그에 직접 사용할 수 있다는 특징이 있습니다.
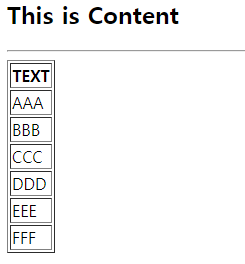
이제 localhost:8080/home으로 접속해 데이터를 제대로 받아오고 있는지 확인합니다.

컨트롤러에서 받아온 데이터를 정상적으로 출력해 주고 있습니다.
thymeleaf의 표현식은 향후 조금 더 자세하게 다루도록 하겠습니다.
이것으로 Spring Boot에서 thymeleaf 사용 방법에 대한 포스팅을 마치겠습니다.
다음 시간엔 첫 포스팅에서 설치했던 lombok 사용법에 대해 포스팅하겠습니다.
'Dev > Spring' 카테고리의 다른 글
| [Spring] Spring Boot 시작하기 (6) - 에러 페이지 처리 (0) | 2020.10.07 |
|---|---|
| [Spring] Spring Boot 시작하기 (5) - log4jdbc를 이용한 Query로깅 (0) | 2020.10.06 |
| [Spring] Spring Boot 시작하기 (4) - Mybatis, MySQL 연동 (1) | 2020.10.05 |
| [Spring] Spring Boot 시작하기 (3) - Lombok 사용 기본 (0) | 2020.09.30 |
| [Spring] Spring Boot 시작하기 (1) - 프로젝트 생성 (1) | 2020.09.28 |


